Looking after your instrument
At some point, violins, violas and cellos will need professional care and attention from a luthier to keep them in good playing condition and avoid wear. It is a good idea to have them checked over occasionally. But there are some easy steps you can take yourself to keep your instrument in good order. There are three main things to do:
- keep your instrument clean, but don't clean it too much,
- keep the bridge straight and upright
- check occasionally for open cracks and seams
Below are some hints and tips on how to do this. If you have any worries or concerns about the sound, buzzes, accidental damage, sticking or slipping pegs, uncomfortable string heights, a worn fingerboard, worn varnish or anything else, consult your violin maker.
Cleaning & Varnish
There are two ways in which instruments get dirty: the build up of rosin, and the varnish wearing or becoming sticky from contact with your skin.
The best you can do to keep your violin or viola or cello clean is to wipe the rosin off with a soft dry cloth every time after playing. A traditional yellow duster is perfect for this purpose, as are microfiber ones. They can also be washed in the washing machine.
Over time rosin can build up and stick to the varnish, and wiping with a duster won’t help anymore. When this happens it is best to have it cleaned by a violin maker. Several cleaning substances are available on the internet and in music shops, but it is better not to use these, as they can contain solvents and oils and sometimes light abrasives. They can take away some of the varnish as well as dirt, and the oils easily go into any open cracks, into bare wood and for example purfling joints if they are open, which will then become time consuming and expensive to re glue as they will need cleaning.
The best is to avoid this rosin build up, by wiping your instrument regularly with the dry duster, and not use any cleaning agents, and if it does happen to build up, have it cleaned by a qualified violin maker.
You can also wipe the wood of your bow with the duster.
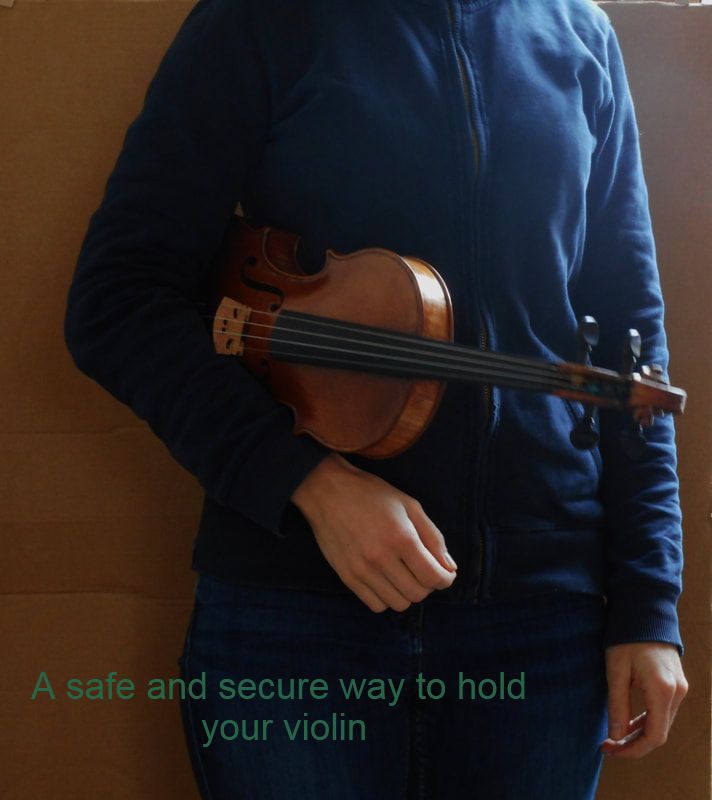
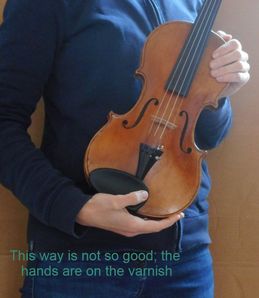
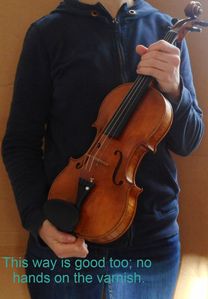
The varnish on your instrument is there to protect the wood from wear and environmental influences like moisture. It is best to touch the varnish as little as possible with your hands, as it degrades easily with the warmth and humidity of your skin. Hold the instrument by the neck and endpin/endbutton only, or hold it under your right arm against your body (if you are wearing long sleeves). Avoid resting your left hand on the shoulder when you are not playing in a rehearsal for example.
In some areas the varnish tends to wear through quicker, for example the shoulder area and the edgework. It is good practise to have these area’s cleaned and retouched by a violin maker, to avoid wearing through into the wood. A protective plastic can also be fitted in these areas to avoid wear.
There are two ways in which instruments get dirty: the build up of rosin, and the varnish wearing or becoming sticky from contact with your skin.
The best you can do to keep your violin or viola or cello clean is to wipe the rosin off with a soft dry cloth every time after playing. A traditional yellow duster is perfect for this purpose, as are microfiber ones. They can also be washed in the washing machine.
Over time rosin can build up and stick to the varnish, and wiping with a duster won’t help anymore. When this happens it is best to have it cleaned by a violin maker. Several cleaning substances are available on the internet and in music shops, but it is better not to use these, as they can contain solvents and oils and sometimes light abrasives. They can take away some of the varnish as well as dirt, and the oils easily go into any open cracks, into bare wood and for example purfling joints if they are open, which will then become time consuming and expensive to re glue as they will need cleaning.
The best is to avoid this rosin build up, by wiping your instrument regularly with the dry duster, and not use any cleaning agents, and if it does happen to build up, have it cleaned by a qualified violin maker.
You can also wipe the wood of your bow with the duster.
The varnish on your instrument is there to protect the wood from wear and environmental influences like moisture. It is best to touch the varnish as little as possible with your hands, as it degrades easily with the warmth and humidity of your skin. Hold the instrument by the neck and endpin/endbutton only, or hold it under your right arm against your body (if you are wearing long sleeves). Avoid resting your left hand on the shoulder when you are not playing in a rehearsal for example.
In some areas the varnish tends to wear through quicker, for example the shoulder area and the edgework. It is good practise to have these area’s cleaned and retouched by a violin maker, to avoid wearing through into the wood. A protective plastic can also be fitted in these areas to avoid wear.
|
|
|
Keeping your bridge upright
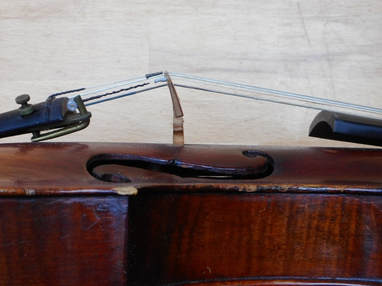
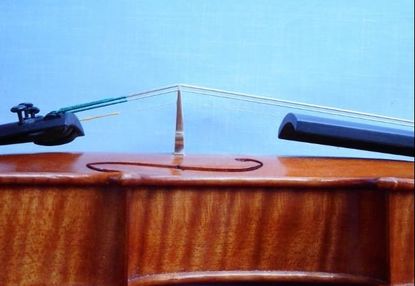
The bridge transfers the vibrations of the strings to the body of the instrument. It performs best when it is straight and upright. Sometimes bridges can warp and/or lean over and stand on their toes or heels. This reduces their efficiency in transferring the vibrations, which is noticeable in the sound. When a bridge is bent over it acts more like a spring as it were, and absorbs some of the vibrations it is supposed to transfer.
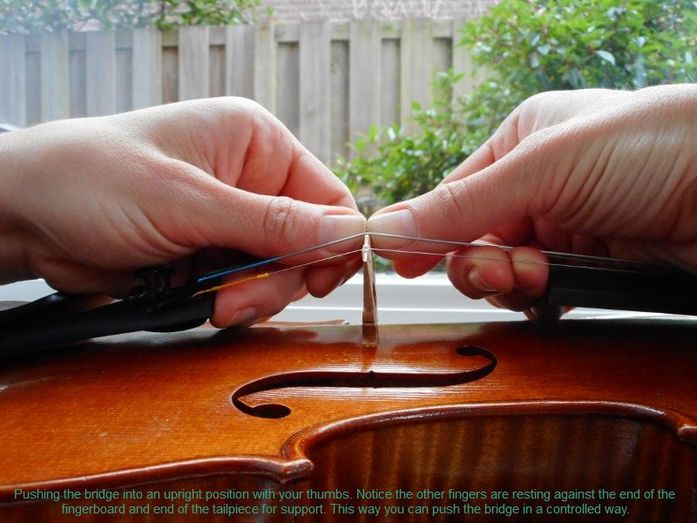
To avoid warping and leaning bridges, always lubricate the string grooves with dry soap or a soft pencil lead when you change a string. Keeping a small hotel soap handy in your case is a good idea for this purpose. After fitting and tuning a new string, move the bridge upright with your thumbs, like in the picture below.
If there is no soap or graphite lubrication in the string grooves, or the grooves are too deep or too narrow, the strings will not slide over but pull at the top of the bridge when you tune. It will be hard or not possible to move into upright position with your thumbs and gradually move and warp.
It is a good habit to look at the bridge from the side when you take the instrument out of its case, or after playing, and check that the back of the bridge (the side facing the tailpiece) is at a right angle with your instrument, and that both the back and the front of its feet are touching the instrument, so that it is not standing on its toes or heels.
If the bridge has already become warped or if the feet are not fitting to the violin or if it Is difficult to move it upright under the strings, it is a good idea to have it looked at by your violin maker. If it is standing on its heels or toes and if you then lubricate the string grooves and tune, you run the risk of the bridge shooting away off the instrument under the pressure of the strings. This only happens in extreme cases. These pictures show some cases of a good straight bridge and an extremely warped bridge, and how to hold it safely when you move it upright yourself.
The bridge transfers the vibrations of the strings to the body of the instrument. It performs best when it is straight and upright. Sometimes bridges can warp and/or lean over and stand on their toes or heels. This reduces their efficiency in transferring the vibrations, which is noticeable in the sound. When a bridge is bent over it acts more like a spring as it were, and absorbs some of the vibrations it is supposed to transfer.
To avoid warping and leaning bridges, always lubricate the string grooves with dry soap or a soft pencil lead when you change a string. Keeping a small hotel soap handy in your case is a good idea for this purpose. After fitting and tuning a new string, move the bridge upright with your thumbs, like in the picture below.
If there is no soap or graphite lubrication in the string grooves, or the grooves are too deep or too narrow, the strings will not slide over but pull at the top of the bridge when you tune. It will be hard or not possible to move into upright position with your thumbs and gradually move and warp.
It is a good habit to look at the bridge from the side when you take the instrument out of its case, or after playing, and check that the back of the bridge (the side facing the tailpiece) is at a right angle with your instrument, and that both the back and the front of its feet are touching the instrument, so that it is not standing on its toes or heels.
If the bridge has already become warped or if the feet are not fitting to the violin or if it Is difficult to move it upright under the strings, it is a good idea to have it looked at by your violin maker. If it is standing on its heels or toes and if you then lubricate the string grooves and tune, you run the risk of the bridge shooting away off the instrument under the pressure of the strings. This only happens in extreme cases. These pictures show some cases of a good straight bridge and an extremely warped bridge, and how to hold it safely when you move it upright yourself.
Bridge bent backwards
|
Bridge upright
|
November 2017